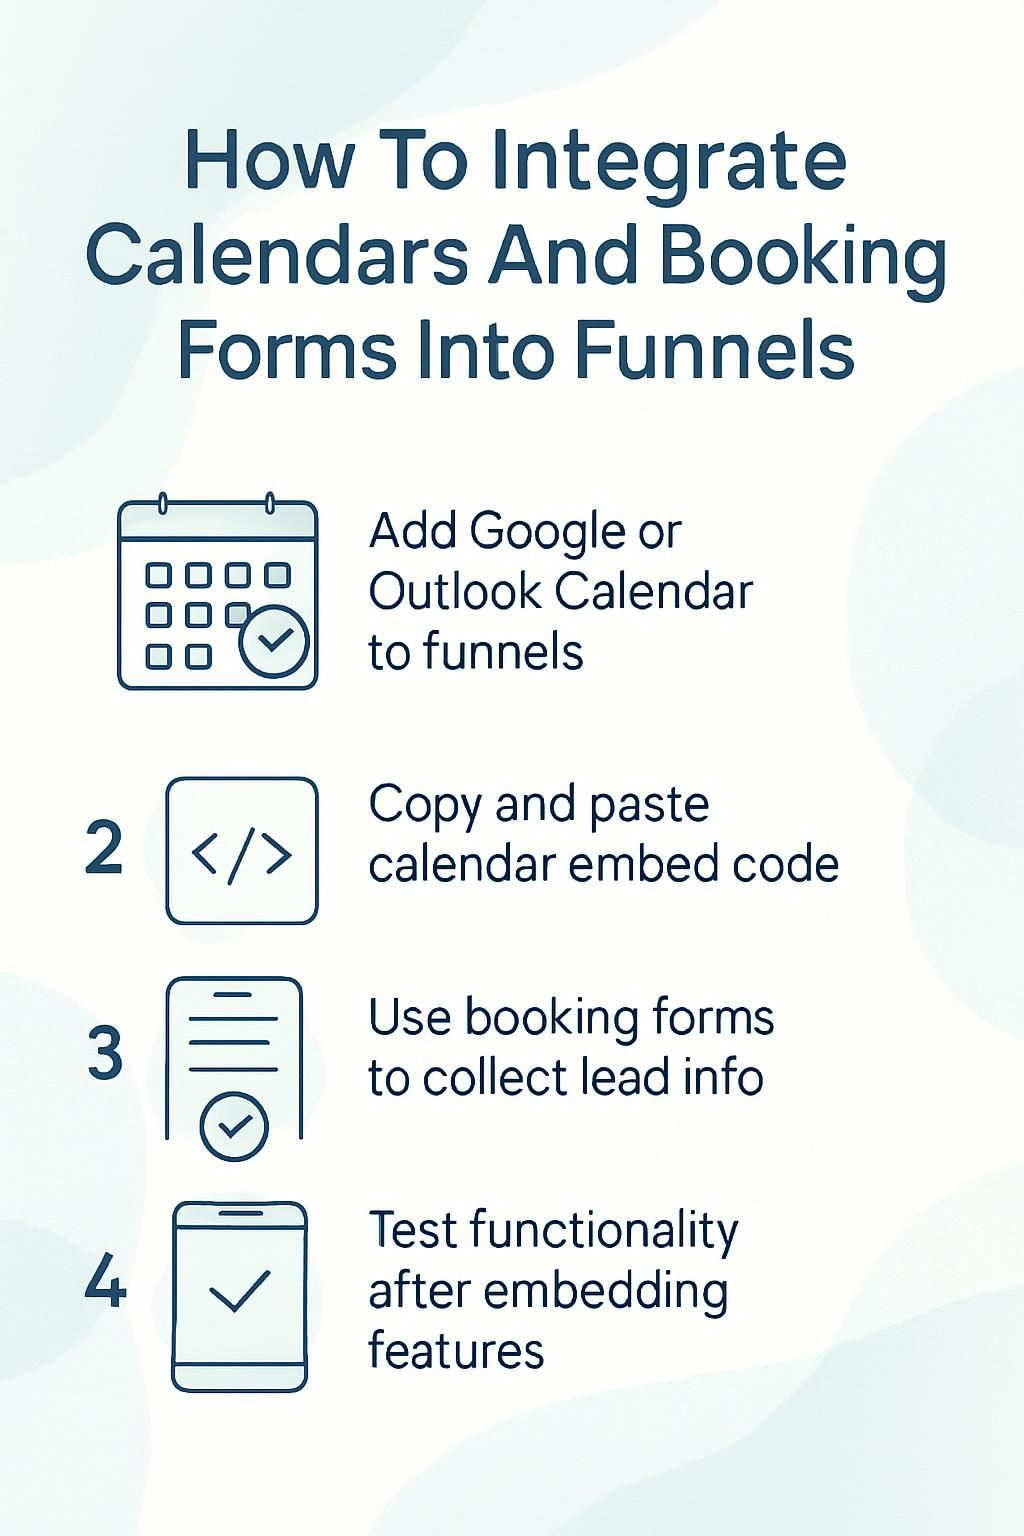
How To Integrate Calendars And Booking Forms Into Funnels

You want your funnel page to bring in more leads, but setting up appointment scheduling feels confusing. Many landing pages lose sales because visitors cannot see available times or book calls fast.
This blog shows you how to add calendars and booking forms using embed code–all with a user-friendly layout in the page editor. Keep reading if you want easier lead generation and better service quality from your digital marketing touchpoints.
Connect Your Calendar to Your Funnel
You can link your online planner right to your funnel page—making it easy for visitors to book appointments. Tools like Google Calendar or Outlook keep everything in sync, letting you track bookings and manage events from one place.
Google Calendar Integration
Incorporating Google Calendar into your funnel page is a straightforward process that significantly improves appointment management. It keeps you on top of all appointments and consolidates them into one convenient location.
- Start by launching Google Calendar on your desktop. Your journey to efficient scheduling begins here.
- Locate the settings symbol, typically a gear situated in the upper right corner.
- Within settings, seek the “Add calendar” choice. Opt for “From URL.”
- Then, procure the URL of the calendar you’d like to include. This link is essential for the connection.
- Paste the previously obtained URL into the box Google Calendar presents.
- Validate by selecting “Add Calendar.” Google performs its operations, and lo and behold, the integration is complete.
- Progress by heading to the funnel builder instrument on your webpage.
- Discover the location to modify pages; it may be marked as “page editor.”
- Select the page where you’d like the calendar displayed.
- Scout for a choice to “embed code.” Here, you’ll insert a distinct piece of code.
- Return to Google Calendar and locate your calendar’s embed code inside settings.
- Duplicate this embed code, then transplant it into your funnel page’s page editor.
- Fine-tune settings such as measurements or colors as necessary to ensure it’s visually appealing on your page.
- Preserve alterations in your funnel builder application.
At this point, site visitors have the capacity to view your available slots directly from your website and reserve time slots with you, eliminating the need for lengthy email chains discussing time specifics! This arrangement aids time management and enhances lead generation as potential customers can book appointments in a straightforward, timely manner.
Integrating Google Analytics tracking into this structure can provide valuable data regarding how many individuals are browsing and employing the calendar for bookings—valuable information for amplifying promotional endeavors via content marketing or Google Ads!
Following these steps, incorporating Google Calendar into your funnel facilitates a seamless process that significantly boosts appointment scheduling – making things run smoother for both you and your clients!
Outlook Calendar Integration

Outlook Calendar is a great tool for scheduling appointments. You can easily link it to your funnel.
- Open your Outlook Calendar settings. Look for the option to share your calendar.
- Choose the calendar you want to integrate with your funnel. Make sure it shows the right event types.
- Find the “Publish Calendar” option. Copy the URL provided.
- Go to your funnel page editor. Look for where you want to add the calendar.
- Use the embed code feature in your page editor. Paste the URL there so it will show on your funnel page.
- Adjust advanced settings if needed, like time zone or event details.
- Save your changes and preview the page to see how it looks.
Connecting Outlook Calendar makes appointment scheduling smooth for you and anyone booking through your funnel page. Next up, we’ll talk about embedding a calendar into your funnel.
Embed a Calendar into Your Funnel
To add a calendar to your funnel, you need the embed code. This code lets visitors see your schedule right on your page.
Retrieve Your Calendar Embed Code
To get your calendar embed code, start by logging into your calendar account. If you use Google Calendar, open the settings and find “Integrate Calendar.” Here, look for the embed code option.
Just copy that link.
For Outlook Calendar, go to your settings as well. Find “Publish Calendar” and choose the options you need. Then copy the HTML code from there. This code will help you add a calendar widget to your funnel page easily.
Add the Code to Your Funnel Page
Integrating a calendar into your funnel page can boost your appointment scheduling. It helps streamline your lead generation process. Here’s how to add the code to your funnel page.
- Open your page editor on the funnel page where you want to embed the calendar.
- Find the part of the page where you want the calendar to show up.
- Look for an option that allows you to add custom code or HTML.
- Copy your calendar embed code from your calendar service, like Google Calendar or Outlook Calendar.
- Paste this embed code into the designated area in your page editor.
- Set the time zone correctly so visitors see accurate event times.
- Adjust any advanced settings in the code, if needed, to fine-tune how it looks.
- Save or publish changes to make sure everything updates properly.
- View your funnel page to check how the embedded calendar appears.
- Make sure it works seamlessly with calls to action and booking forms.
This process is simple and effective for keeping everyone informed about events!
Add Booking Forms to Your Funnel
Adding booking forms to your funnel is a great way to connect with leads. You can create a simple form that fits your needs, then easily place it on your funnel page. This makes scheduling appointments quick and easy for everyone.
Create a Custom Booking Form
Creating a custom booking form is a great way to connect with your clients. It can help you manage appointments and gather leads effectively.
- Choose a platform for your form, like Google Forms or Typeform. Many tools offer user-friendly templates for easy setup.
- Decide on the fields you want in your form, such as name, email, phone number, and preferred appointment time. Make sure these are essential for your scheduling needs.
- Set up different event types if needed. This allows clients to choose specific services or meetings they wish to book.
- Adjust settings to suit your needs. You might want to define time zones or set availability based on your schedule.
- Design the form to match your brand style. Use colors and logos that reflect your business image.
- Test the form before sharing it widely. Make sure it works well and there are no errors in the booking process.
- Integrate the form into your funnel page easily using an embed code from your chosen platform.
These steps will help you create a custom booking form that fits perfectly into your funnel page and boosts lead generation efforts!
Embed the Form into Your Funnel
You can easily add a booking form to your funnel. This will help you gather leads and schedule appointments.
- Create your booking form using a tool like Google Forms or Typeform. Customize it with fields that fit your needs, such as name, email, and preferred time slots.
- Save your booking form once you finish building it. Make sure to get the embed code from the form settings.
- Open your funnel page editor in your website builder. Look for the area where you want to place the booking form.
- Paste the embed code into the designated spot on your funnel page. Using this code helps visitors see and use the form right away.
- Check that everything works correctly after embedding the form. Test it by filling out the form yourself to ensure it collects information as planned.
- Adjust any advanced settings if needed, like time zones or event types for appointments.
- Save your changes and publish your funnel page so others can access it.
Embedding forms allows you to streamline appointment scheduling directly on your funnel page while boosting lead generation efforts!
Conclusion
Integrating calendars and booking forms into your funnels makes things easier. Your visitors can book appointments right from your website, which boosts lead generation. Adding these tools streamlines appointment scheduling and saves time for everyone involved.
With a few simple steps, you can make your funnel page more effective and user-friendly. Take action now, and see the difference!